Friday, December 30, 2011

Second Grade Framed Portraits


Second grade students studied the portraits of Frida Kahlo. Students created their self portraits with glue  line printmaking.
Students created their prints in a few different colors. After completing the prints, they chose their favorite and created a frame, with designs in oil pastel.


Printmaking is one of my favorites. Students find so much success!
You can see more of these prints in our Artsonia gallery.

Thursday, December 29, 2011

This worked for me! Tessellations


This lesson is from a couple of months ago, but it was highly successful. I taught tessellations years ago, but the way I did it was very confusing. Confusing for me, even more so for my students. I don't know why I didn't think of doing it with an equilateral triangle where mirror images complete the image. When I saw this idea back in September from Artful, Artsy, Amy, I was also desperate for lessons that used the supplies I had. Copy paper and markers were perfect for this 5th grade lesson. I used the hand out that Amy posted. As you can see from these examples, even less than perfect examples turned out pretty nice. You can see even more tessellations from our Artsonia gallery.
The one thing that I probably should have emphasized to my students was making sure that each figure was very distinct. Some of my students made robot-like figures that were difficult to put together successfully.
Thank you so much Amy for posting about this!

Wednesday, December 28, 2011

Artsonia?

Artsonia is definitely where I have been this year. I decided at the beginning of the year that I would publish all student work. However, it is taking up soooo much of my time.  We spend more than one class on most lessons, so it could be worse. I thought I would do this as a way to share student work with parents, grandparents, etc. I don't have that many visitors, though. I am wondering if it is worth it. What is your opinion of Artsonia? Do you use the site? If you do, what makes it worth it? How much do you upload? Do you do all of the work yourself?

Sunday, October 16, 2011

Embracing Día de los Muertos

As I mentioned before I've had a hard time getting supplies this year, so much of my long term plans disappeared. I had planned on a couple of classes studying Day of the Dead, now nearly all of them all.  There was such excitement in my first class over the celebration, so now I have fully embraced it. This was a great way for many of our students to share what they do for Day of the Dead. Plus, drawing skeletons is FUN! Fortunately, the last art teacher left this skeleton. I dressed him up for drawing a couple of different ways. The last art teacher had named him Bob and said he was her boyfriend, so my 4th grade boys were very concerned about Bob in a dress. Photos of projects will be coming soon!

Saturday, October 8, 2011

Sunflowers and Skies!


Not a bunch of new ideas here, but my third graders did such a great job on their sunflower drawings that I had to share. 

We looked at sunflowers (fake ones, though) both individually and in a vase. Then my students just took off with it. I think they mades some interesting choices.


Second grade also studied Van Gogh, but this time Starry Night. We compared Van Gogh's painting to different photos of our city skyline with different skies. The kids were so excited to see photos of their own city, "That's where I live!" They could create any type of sky they wanted. We had storms, sunsets and cloudy skies galore. We had some very colorful ones, and they all turned out fairly successful.
A few of my favorites.
Most of them made no attempt to follow our city skyline at all, which was perfectly fine. I think they turned out great!


Monday, October 3, 2011

Going Green

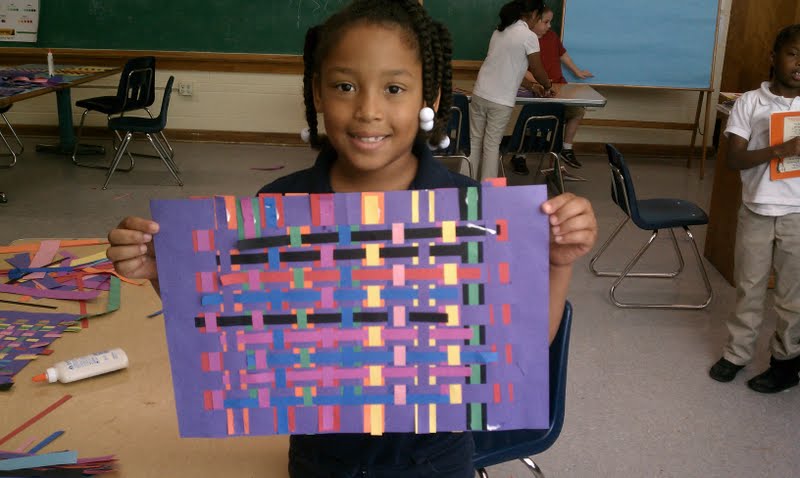
This photo doesn't have anything to do with this post. This is a project that my 6th graders completed this month. Idea from here. I am so impressed with the number of students that she had do this project. Not even sure how so many managed it. And Yep, my bulletin boar is partially covered by the copy machine.
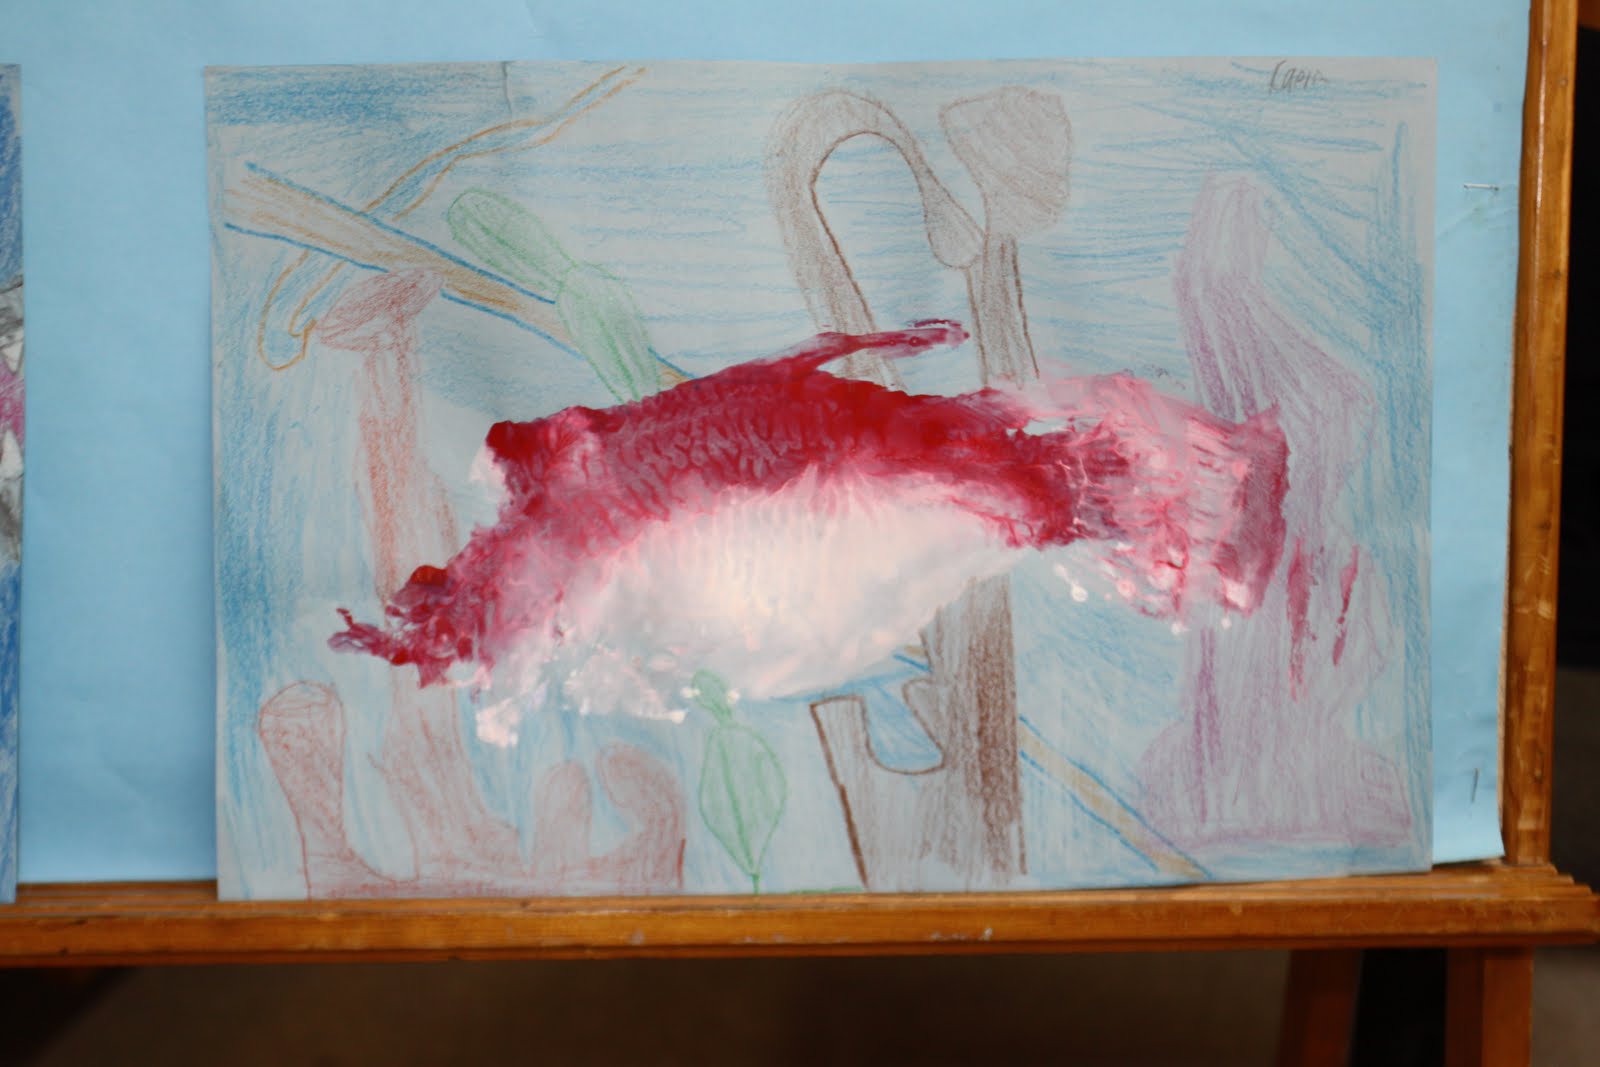
I think art teachers have always been pretty good about reusing materials in the art room, keeping thrifty, showing our students that art can be made from ANYTHING. I have seen so much more lately about green items. Not just in the classroom, but from friends making their own laundry detergent, even. It seems that lately, it isn't as much about saving the environment as it is about being strapped for cash. I even read about one school who was going green by no longer printing worksheets for homework. They were going to let the parents print the worksheets, instead. Ha!

It makes me think of trying to explain to my students that we shouldn't throw away paper that had a small mark on it, because they were made from trees. "We need to save the trees!" The kids looked at me like I had a tree growing out of my head. Then, I said, "we don't have enough money to buy more paper!" In unison, my kids said, "OOOOOOHHH." Now I was speaking their language.

I've always been fairly thrifty in the classroom. I've had many years of very small budgets. This year, the pinch is pretty bad. The order that I placed in our school system's warehouse back in the middle of August has not been filled. I finally received a little bit of construction paper last week. I'm feeling a bit desperate for tempera paint and white drawing paper, though. The other items that have been purchased for my room have come from my sad paycheck. I bought crayons, markers, pencils, and oil pastels. Out are the long range plans at this point. We should be painting by now, but I can't teach color theory without yellow.

In the spirit of full disclosure, two of my projects have been funded this past month from donorschoose.org. If you are feeling the pinch, and don't know about this program, check out their website (I don't work for them, free publicity!) To help fund one of the projects, I was even willing to make 4 videos of myself talking about teaching. Some areas have foundations that match donations. I am fortunate to live in a city where we have a wonderful foundation that supports education by matching half of all projects in high poverty schools. It makes a huge difference to only need to find half of the funding. These were my first two projects through donorschoose and I am hooked! One of my projects was for linoleum block printing for 6th graders and the other was for TEMPERA paint! My plan was for this to be in addition to my order through the school system, but this may be all of the paint that I get. Hoping it comes in soon.

So, until I receive my paint order, I'm looking for lessons that can use what we already have. Collage with fabric and wallpaper samples?   Somehow I have a ton of manila paper. What do you do with that? Thinking I am going to collage on it. Can we do printmaking on white copy paper? I have a lot of it, too! What are you doing to save money in your classroom? Are you having more problems with budgets this year, too?

A few things I am doing:
  • GOOSE paper (I read this on someone's blog last year, so I would be happy to give credit if someone knows where.) Goose paper is paper that is Good On One Side. I keep pulling paper out of the recycling bins around school. We use this for free draw for fast finishers.
  • Bottle caps- I am jumping on the bandwagon here, but if I can get them for free, let's do it.
  • Cups-I did this last year, too. We are going to weave on recycled cups. 
  • Milk jugs- another repeat from previous years, masks made from 1/2 of a milk jug, with paper mache, again recycling newspaper. 
  • Magazines- Obvious one here, collage. I went to the recycling center last year and pulled out newspaper and magazines. Fortunately, I went on a day that they were pretty full, so I didn't have to get INTO the dumpster. 
  • Mat board-Mat scraps from a frame shop. This is what we will probably be using for painting. Guess I'll gesso ahead of time? Do you think that is necessary?

Tuesday, September 6, 2011

Crazy about color (coordinating)

So, yeah, I'm really proud of all of the work that I've done on my room. Organization is not my best area, so this has been my goal for this school year. I have pored over art teacher blogs and pinterest (ah, pinterest.) And, I feel a little bit like a crazy, color coordinated lady. I've always organized my tables by color, but now kids MUST get the bucket that belongs with their table, and put their sketchbooks in their color , and follow the behavior chart by their color, AND get PLACEMATS (good grief, I made color-coordinated placemats) for their table color, AND put art in their tables' folder, AND put art on the drying rack WITH their colored placemat so that I can keep art from their table together. MAYBE I'm going a bit overboard, but I am just SO determined to be organized. Somehow this is supposed to make my job easier (I hope!) Of course, since I'm doing all of this color stuff, I'm decorating with color stuff, too. I LOOOOVE bunting, and have made it before for my children's birthday parties. I decided that we needed some colorful bunting in the classroom, too. I also made a rainbow curtain to hide the junk that is in the storage area. I'm trying to be organized but I don't have anywhere else for all of my boxes of clay, and ugly rack to go. All this is hidden by a gray curtain with rainbow down the center.
I feel very fortunate to have a sink, kiln, and smartboard, but, boy does my room feel tiny, especially with larger classes. I haven't made them yet, but I am planning to keep student work in portfolios this year. For the most part, it has just driven me crazy in the past when I see students fold up art to take home, or seen teachers trash it before giving it to students (I so wish that I was kidding.) I like the idea that students will take all of their art home in a special way, and will be able to see their progress throughout the year. I also like that students can go back and rework art that they don't love. However, and this is the reason that I haven't yet made portfolios, where do you store all of those things? I have nearly 600 students. The portfolios will all be made from bulletin board paper (I know posterboard would be better, but I don't have the budget to order something new. I'm going with what I have.)

I have rows of cubbies that you can see here. We are using them for "sketchbook" storage (folders with loose paper in them.) And, the folders barely fit.
Behind the cubbies, is my main flat file storage. This is where I am planning on keeping our current projects, but, as you can see, there won't be room for every student's portfolio in each small drawer.
I do have a large rolling rack (that I am assuming is meant for clay? maybe.) I could potentially stand some of the portfolios in there, but I'm not sure that it will work. Plus, it is where all prints are kept right now. I don't have many and could deal with it, but then, where do portfolios go when we are doing clay?   I thought about a large box per class, but then, these would just have to be lined up on the floor somewhere. Any thoughts that any of you have on portfolio storage in a fairly small classroom, please let me know.

Monday, August 22, 2011

First day of Schoo-oool!

Today was our first day back. (My daughter is in a different system and started first grade last week. There were tears on my part.) As always on the first day, things were really hectic. My schedule is really crazy, though I realize most of us are teaching variations of crazy schedules. I had more than 30+ kids in my first grade and Kindergarten classes. I may end up teaching first grade in centers as well. There are just so many kids in there. Hope everyone who is starting already is having a great year!

Sunday, August 14, 2011

Almost there...

School starts in just over a week. I'm mostly done with my classroom, just a few small things to help establish routines and maybe a few things to jazz it up as well. I'm excited about what I have so far, so I'll share what I have.
Look at all my borrowed ideas... I loved the idea of a job chart for every student. I got this idea from Mrs. Picasso's art room, but used self-portraits of famous artists. Each bubble will be filled in with a job for that day. 
A view of this wall. I only have very small strips of bulletin boards above the white boards, so I am taping onto the white boards at this point. I also found this unmounted bulletin board in the back room, so I will be adding that as well. I do not love that I have the boxes of clay in the open shelving, but I'm just working with the storage that I have (obviously, not great.)
Another borrowed idea, though it sounds like she is looking for a new plan for assigning seats. In the past, I usually have just assigned tables and told students to sit in any chair at that table. I decided that I needed a new plan this year.
Another shot of my desk, smartboard and the kiln in the storage area.
Another view of the storage area in the back and wall of windows.
Color coordinating all of my buckets for supplies. 

I had mentioned before that I was spending the summer reading about classroom management. That has seemed to always be one of my lowest areas and was definitely last year. From much of my reading, I decided that procedures was probably the specific part of classroom management where I needed the most help. Previously, I did not practice procedures very much at the beginning of the year. I would explain procedures, which changed frequently based on media. I decided this year that I had to make as many procedures as possible clear from the very beginning. That was the biggest thing I liked about the bulletin board where each student has a job and knows where to find it. Even if the job is completely different, at least it is clear who will be doing what job each day. It is a whoa..whoa..whole lot of work to figure out every procedure that will be basically needed throughout the year. This will be a learning process for me. 

Of course, I spent the summer reading about classroom management, read books, blogs, etc. And then, I find out that my new school had a three day workshop, which turned out to be about classroom management, basically. So, my new rules plan, etc is changed. Sort of. There was still talk about establishing procedures. The workshop was called "Changing Kids' Hearts," and includes creating a contract for behavior, so I will be working on that with my students in the first week and a half. Hopefully, spending time establishing procedures and having students buy into our social contract will give us more class time later in the year, so I'm not spending so much of my time correcting students. 

Any suggestions you have for establishing procedures would definitely be helpful. Looking at my photos, I really want to jazz up the room, though it might not happen before school starts. I can always add items later. 

Monday, July 4, 2011

Organizing Lessons

Organization is not my strongest suit, but I work at it. Once upon a time, I photocopied and printed lessons, and put them into folders by media. It worked/works ok, but I really don't want to keep printing so many things, too much paper waste. I am sure that I will still do some printing, but I wanted a better way to organize my online lessons. Sometimes I would copy all into a new document, which then went into a file on my thumb drive. Doable. I also would star items from blogs I followed on google reader. Also, doable. Several of my quilting friends have been telling me to join pinterest for awhile, but I didn't think about it as an education site. I decided to join, anyway. Now that I'm on, I am HOOKED. You add the "pin it" link to your dashboard, then click it on any photo you want to link. You can repin others' pins, which seems to be one of the best aspects to me. If you are linked to other art teachers, you can share and reshare ideas like crazy. The only downside I see at this point is that it only links to photos. I would like to be able to save text versions in the same space. So, if any of you are on pinterest, you can follow my art dashboard (or just check it out) at http://pinterest.com/ashmom/art-lesson-ideas/

Monday, June 20, 2011

Last project


In general this project was a bit more camp-crafty than my usual lessons, but I decided that it was fibers enough rather than a different weaving project. I was inspired by this project through Craft Hope. If you are not familiar with Craft Hope, they are a group who works to send handmade items to those in need. They enlist crafters to help with different projects. This particular project was sending handmade bracelets to Russian orphans. I liked the idea of having my students make something as a service project. Some of the kids didn't get it, but others were excited to make bracelets for other people. I told students that, if they had time, their second bracelet could be kept. Unfortunately, with end of the year assemblies, field trips, and my own family emergency, we didn't finish quite as many of these as I had hoped. However, we did manage to send this pile of bracelets by the June 15th deadline. (I may have counted them, don't remember.)

Sunday, June 19, 2011

Simple Paper Weaving

I've taught variations of paper weaving in the past, but hadn't seen any like this until this year  from other district art teachers. By simply adding thin strips on top of the thicker ones, they look deceptively complicated. Some of my kids really took off with the idea. Originally, I had planned to have them add smaller shapes to make these more interesting, but the end of the year seemed to come too quickly. These  are first graders.


Monday, May 16, 2011

Clay redo

Another lesson repeat was these clay fish by first graders. I've seen them on a few sites where they made them with pinch pots. For ours, we used a clay slab or pancake wrapped around newspaper.
The students added texture to the fish and painted the clay with watercolor after firing.
Kindergarteners tend to flatten their clay no matter what you are making with them. I just go for the flattening instinct and have students make clay masks. This student didn't add a lot of clay, but kept nice details through drawing and, again, painting with watercolor.

Sunday, May 15, 2011

Clay cupcakes

I've seen this lesson on probably half a dozen blogs this year.  I loved the idea and decided to do the same lesson this semester with my third graders. We had a few bottoms get a little squished during storage, so some of them don't fit as nicely together. I will definitely do this lesson again, but do a few more teacher checks on them. I don't have glaze at my school this semester, so we painted these with acrylic paint. Some of the paint has a nice sheen, so they were really using that to make them sparkle! The students were so proud of their work, and so was I!


Gyotaku again

Since I'm an art teacher at two schools, one for a semester each, I planned to just repeat the lessons that I did the first semester in the second. I'm always finding such interesting new lessons, so I ended up changing quite a bit anyway. Some lessons I changed just because of time of the year (Van Gogh sunflowers didn't really fit in February.)

 One lesson I did both semesters was fish printing or gyotaku. It was just such a big hit with my students and so very out of the ordinary for their experience that I decided to do the printing again, but I printed with all grades this time.

Last semester, they printed on white paper and just left the clean print. This semester students printed on construction paper (I had plenty of construction paper, but not so much white) and then added a background. I loved some of their creative ideas. I've seen others add the background first, but I liked to have the students totally in the dark about the fact that we were printing with fish.
Again, this was so much fun! It also felt like a bit of a (busy) break from what has been a pretty stressful year.

Monday, May 2, 2011

Hot Dogs and Cool Cats


Another "stolen" lesson idea, this time from Joanna. I loved her "Hot Dogs and Cool Cats" color lesson. The kids really understood the warm/cool concept after this painting.

I did this lesson with Pre-K through 1st grade. Though I got the best results from 1st grade, they turned out pretty nicely with the younger grades as well. Thanks for the lesson!


Related Posts Plugin for WordPress, Blogger...